Create Your Custom Signature in Photoshop
Your photography brand and logo are important. Make them unique. Creating a custom signature on your photographs was more difficult before Adobe Photoshop tools became available. But now, with a few tools and techniques, it’s easy to create your unique signature.

Custom Signature Creation:
Outline of Tools and Techniques: To make your unique signature, we first use the Canvas Size or the Crop Tool to make a matte border around a picture. Then, we create a brush, and this brush will stamp a custom signature into this matte border. You will be clicking on Tools in Photoshop’s Top Menu to grab Photoshop’s Color Picker, use the Edit>Define Brush command, File>New command, and open the Color Swatches and Layers Palettes.
Level: Beginner and Intermediate Photographers with advanced tips.
Time: 15 minutes, or 25 minutes for advanced techniques.
Step 1: Opening Photo, Making a Matte Border
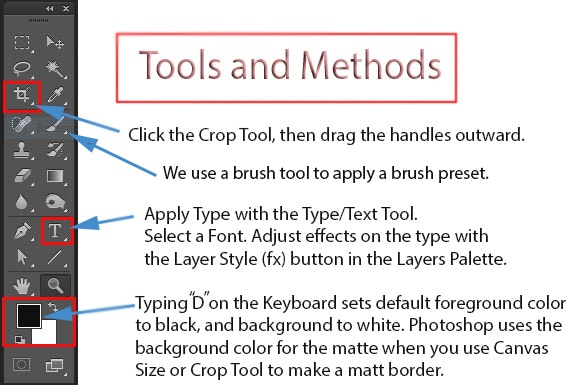
Open your photo into Photoshop. Make sure your Toolbox Pallet is open. To make a border, click on your CROP TOOL in your toolbox. Look at the bottom of your toolbox. The color of your border will be the same color as the Background Color that shows up in the Toolbox Color Square at the bottom lower right of your Toolbox.
Now, using your mouse or tablet pen and pointer, click on and grab the handles at the corners of the Crop Tool border around your photograph and then pull them out from your photo. After you do this, Photoshop will make the dashed line into a solid line with 8 adjustment handles at the corner and sides of the image area.
Step 2: Expand the Matte Border
Pull out with the four corner handles until you have the border the size you want. The grid over your photo can be changed to Rule of Thirds or other settings. Now, click the check mark to apply, and you will see a border around your photo. As you drag the crop tool handles, you’ll see the nominal size change. Click any other tool to deselect the crop tool.
Step 3: Signing Your Signature With a Brush
Next, make a new blank document (Command+ N on the Mac, Control + N in Windows) that is 400 pixels wide by 150 high at 72 pixels per inch. Don’t close your photograph document, leave it open and in the background; you should see its tab next to the new blank document in Photoshop’s main window.
Type the letter “D” on the keyboard to set the Foreground color to Black and the Background color White. Now, open a new file with File > New (Control Key+ letter N in Windows, Command+ N on a Mac). Make sure the image file is a blank white. Click your horizontal type tool (T) and choose a 48 point type. Make sure to choose a font you like for your signature. It can be a cursive style or any style that suits your design. To apply your text, click inside the blank document and type your signature name. I use the keyboard Delete Key or Backspace key when I make a mistake. When you have your signature the way you like, use the Toolbox Move Tool (V on the keyboard) to position your signature in the center of the box.

Step 4: Make a Brush Preset
Select the image with the Select All command ( Control + A on Windows or Command + A on the Mac) on your keyboard). You’ll see marching ants around your signature. In Photoshop’s top menu at the upper left of your PS window, open a drop down by clicking Edit > Define Brush Preset.
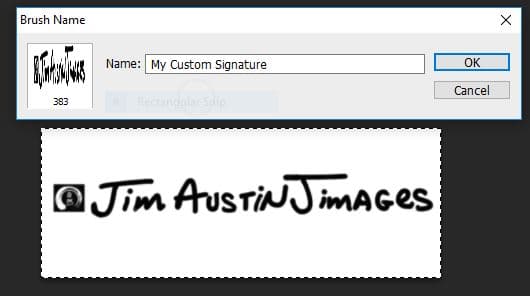
In the brush preset pop-up dialog box, name it My Signature or something similar.
Note: we are not using the existing brush presets that came with the program, we’re making a new one.
Step 5: Brush Tool
Click on your Brush Tool (B). The Brush Tool can be selected either by clicking on the Brush Icon in the Vertical Tool Bar or by using Keyboard Shortcut Type Letter “B.” Tools with small arrows on the bottom right corner will open to fly out menu options. The Brush Tool gives you options for the Brush Tool and underneath it the Pencil Tool, a Color Replacement Tool, and Mixer Brush Tool. When one of the other tools is selected in the flyout menu, its icon will replace the main brush icon in the Vertical Tool Bar. Make sure your brush is set to Normal, and 100% Opacity.
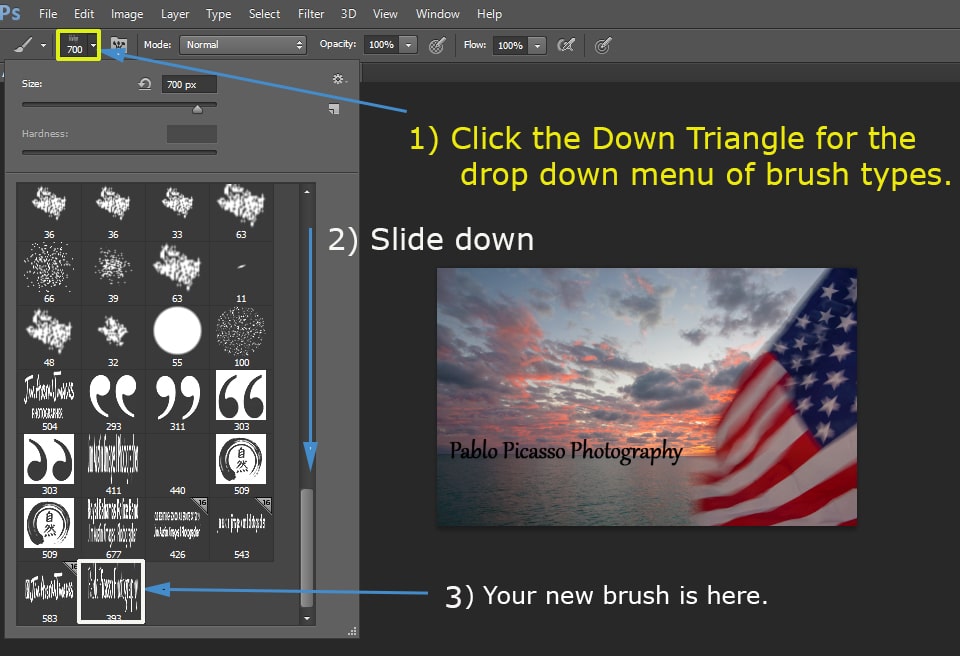
Now, find the Brush Size and Type dialog box. It is at the top of the screen, just below the word Edit. Click Edit and slide the slider to the bottom. You will see the brush preset you just made in the lower right of the brush types.
Step 6: Stamp Your Custom Signature With Your New Brush
Return to your original file, the one with your photo and border, by clicking the tab at the top of its window. Make sure you have the brush tool selected in your Toolbox. Using your signature brush preset, click in the matte border area with your new brush to stamp apply your Custom Signature onto the matte. Save your file (File> Save).
You have now created a new layer in the Layers Palette. To see it, click Window > (show) Layers (Keyboard Shortcut F7). In your Layers pallete, you can change layer Opacity, layer Blending Mode, and other aspects of the layer to enhance how your signature appears. For instance, you can add a Layer Effect like a Color Overlay to your custom signature.
More Advanced Tips:
Custom Signature for Large Prints
To make a custom signature for large prints, we make a transparent file and load it as a custom brush preset. Start with File> New to make a blank image file. Set it to 800 pixels high by 3600 pixels wide at 300 ppi. Set your Background contents to “Transparent.” I also set the Color Profile for my printer and print paper type.
Maximize your custom brush, then stamp your brush signature inside this large transparent file to apply your custom signature. Now, File> Save As to save this custom file as a .png file type. You can then open this image file (the custom signature) onto any photograph by clicking File > Place. Photoshop will import it into your image.
To change its size, drag the handles. You can change color or opacity because Photoshop automatically makes the .png into a Smart Object placed on its own layer in your Layers Palette. Because it is a smart object it is nondestructive and infinitely editable. The key is that you can scale the custom signature up in size, and it will print well as a vector, not a raster image.
Change Canvas Size
The canvas size technique is another easy way to make a border around an image. Click Image > Canvas Size. Increase the Width and Height. There are settings in inches, but I choose the Percent setting instead of inches and increase the size by about 10 to 15%.
Wacom Tablet
If you have a Wacom tablet, you can use the brush or pencil or any drawing setting on the brush tool to write your custom signature. A tablet gives the option of pressure sensitivity to Photoshop’s tools. (Wacom.com).
Different Color Matte
You can make double and triple mattes of differing colors, with the crop tool or canvas size command. Just double check to make sure the color you want for your matte border is the color that is loaded into the background color square in the toolbox.
Add Shapes and Shading
Add shapes and shading to your custom signature with Photoshop’s shape tool in the toolbox, and make custom effects like a drop shadow on your signature text with the Layer > Layer Style command.
To Summarize
Now you can quickly and easily apply the signature brush to any of your photographs in the future!

https://www.apogeephoto.com/photoshop-custom-signature/