Use your fear as a stepping stone, not a sofa

December 28, 2020 6 min read

This article was translated from our Spanish edition using AI technologies. Errors may exist due to this process.

Opinions expressed by Entrepreneur contributors are their own.

  • Hear.
  • Evolve.
  • Prepare.

2020 has been a challenging year in many ways, but full of opportunities for women entrepreneurs and entrepreneurs. At Victoria147 we look at entrepreneurship as a door that opens to face the reality of now or never and begin to believe in dreams.

Given this, we compiled three stories from members of Red Victoria , to inspire us on valuable lessons on how to configure the moment to dare to undertake and turn fear into the perfect emotion to do so.

LISTEN, the instant of feedback

The rapid and unforeseen changes such as the one that came with the crisis caused by COVID-19 put many entrepreneurs in check, since they had to close their business or suffered a tremendous lack of demand that quickly led them to the red; without a doubt, the greatest fear of anyone who invests their resources in entrepreneurship. One way to get ahead is by adapting.

Folklórika is a company that is passionate about textiles and gastronomy. For more than seven years he has been selling custom uniforms for the hospitality area. When the world of events and gastronomy was forced to retreat, consequently, so did its demand for inputs. What did this company led by Bianca Bejos do? He used his resources and saw the problem as an opportunity.

Hand in hand with professionals, they began to develop face masks with all the specifications that are required for greater protection, they listened to customer feedback and worked on a second edition to perfect various details and take care of health in the best way. So, they presented a 2.0 mask, made from breathable and fresh, anatomical fabrics and available in more than 3 colors. In addition, they are made with triple protection and a thermo sealed filter that when it wears out you can change it for a coffee maker or vacuum cleaner.

To date, they have sold close to one hundred thousand units and counting, while staying on the path to perfecting their processes and guarantees that allow them to certify the use of these accessories that began as an act of solidarity by manufacturing 500 units for medical personnel. of the Women’s Hospital.

Image: Depositphotos.com

EVOLVE, the step to go further

Even for those who already had a good section of the journey of entrepreneurship, the onslaught of the crisis put them in front of obstacles such as fixed customers who had to leave, projects that were canceled and a whole series of sudden and unexpected changes that forced them to evolve . How to bring your products or services to people who now consume more online? The feeling of closeness and interconnections were the key for many.

Cecilia Bernal y Sánchez, founder of Mercarte, the first Branding Art and Cultural Management agency created in 2015, found a way to get around the recession wall and discovered a new business unit that has now become an important edge in their future: online courses.

Although everything in Mercarte has to do with art, the end users were not in its main target, rather they had focused on developing projects for brands; However, practically experimentally, they began to teach courses with historians via ZOOM, aimed at those who were looking for a space for learning and recreation in the midst of confinement. Today, in the voice of its founder, this is another of the possible futures for Mercarte and to achieve it they needed to close ranks, join forces, get down to work and turn fear into gasoline, by throwing the correct match.

PREPARE, time to create

The success stories of those women entrepreneurs or businesswomen who try again and again, without stopping before the challenges, are more than inspiring. Above all, those that start small, but with effort succeed, become incentives for all those who seek inspiration.

Two years ago Hilda Haghenbeck had an idea while still in college. She began by offering cosmetic treatments, from home tanning, nails and haircuts, until eventually she ventured to set up a beauty salon: Studio9 Beauty Bar. Just when everything seemed to be heading, the state government ordered the closure of establishments non-essential.

For this enterprising woman, it meant the start towards a path, where preparation is the protagonist. After putting it off for several months, Hilda says she finally stopped seeing her own business training – such as budget management, human resources and communication strategies – as an expense to transform it as an investment; and acquire capitalizable knowledge in your business.

A couple of months later and even before the new notice of closure of activities until January 2021, Hilda has already developed a strategy to sell personal care products via Instagram, which allows her to maintain her current expenses, payroll, reinvestment and even savings. ; In addition, it is working on a business plan that allows it to be competitive with other sales channels in large beauty product stores.

https://www.entrepreneur.com/article/362393


5 Quick Business Tips for Recent High School Grads

These networking tactics can help pay dividends in the future.

July 8, 2019 6 min read

Opinions expressed by Entrepreneur contributors are their own.

Whether you decide to go to college, join the workforce, start your own business, or take any other path after high school, there are always opportunities to learn in ways that will ultimately help your career. Taking real-world knowledge and implementing it into your life can help you move up the ranks faster and start making money now.

To start, think about these five tips:

1. Jump into LinkedIn

If you haven’t joined LinkedIn yet, do so immediately. While all your friends might be focused on Instagram or Snapchat, LinkedIn provides you with unbelievable access to the business world. As the largest professional social network, it’s where you should be looking to build yourself up online so that when someone Googles you, they’ll be able to find your professional presence, not just what you’re doing for fun on TikTok.

Once you create a LinkedIn profile, start to join groups relevant to your career interests. Whether you’re interested in marketing, hospitality, technology or almost anything else, there are multiple groups you can join. In these groups, you’ll find relevant content you can learn from, and you can start to network with people in these fields.

By being on LinkedIn, you’ll put yourself so much further ahead than your friends who ignore this platform.

2. Gain experience by volunteering

When you join LinkedIn, you may not have a lot of work experience to add, but don’t worry. There are plenty of ways to gain solid experience through volunteering, and you can add that experience to your LinkedIn profile.

Start by going to your local Chamber of Commerce or trade associations to see if you can volunteer at their events or help out in some other way. Doing so helps you learn about the business world and gain some new skills from important professionals in your community.

You can also volunteer at conferences that come to your city, or even at events like concerts, where you can offer to help with social media promotion, ticket sales or anything else that gives you some work experience. No matter how big or small the experience may seem, there are always skills to learn that you can use to impress other businesses.

3. Think about your social media presence as your personal brand

When you posted on social media in high school, you may not have been thinking about how that will look to employers and other businesses you want to connect with, but it’s important now for your social media channels to reflect the personal brand you want to build. That way, when people look you up, they’ll see what you have to offer professionally, rather than judging you based on inappropriate content you may have posted in the past.

So go back through your profiles and delete old content you wouldn’t want professionals to see. Your content doesn’t have to be entirely serious, but you don’t want anything embarrassing. And to start building your brand, find ways to add additional content that relates to your professional interests. For example, if you’re interested in writing, try blogging on LinkedIn or on sites like Medium. If you’re interested in video production, create vlogs on sites like YouTube.

Building your personal brand at a young age is a good investment that can translate into money over time, as you network with professionals on social media and build a presence where businesses can see your skills.

4. Reach out to businesses and influencers you want to work with

To start gaining experience with high-profile people and businesses you want to work for, you have to put yourself out there and be persistent. Start by making a list of around a dozen brands or influencers you’re interested in, and then reach out to them on Instagram, through email or however else you can try to get a hold of them. When doing so, state upfront what you’re willing to do for them for free that helps them.

For example, many businesses and influencers, myself included, are always looking for people with photo and video skills. If you’re interested in that, get a camera and start learning these skills. Then reach out to brands and influencers and offer to take photos or video for them, such as when they’re at a conference in your area. Or if you’re interested in writing, offer to help them create blogs or social media content on topics you’re knowledgeable about.

Be persistent with your outreach. You can’t message someone once and give up. Keep trying, state what value you bring each time, and you’ll improve your odds of getting through to them.

5. Start to earn money while gaining experience

In addition to reaching out to companies and influencers to offer free work, you can use your age to your advantage to start making money. Many brands want to improve their youth marketing, so offer to teach them what people your age are looking for from brands online, or offer to create content that makes an impact on your peers.

While you may not connect with big brands right away, start by approaching local businesses and offer to work for around $12 to $15 per hour to get your foot in the door, make some money and gain valuable experience.

You can also make money right away by driving for Lyft or Uber. While you’re driving, you’ll meet all sorts of people that you can network with to ultimately help your career.

By following these tips, you can set yourself up for long-term success a lot sooner than if you wait around to move up the corporate ladder. Use your social media skills and your age to your advantage, and you can be on your way toward a successful career.

Watch more videos from Carlos Gil on his YouTube channel hereFollow Carlos Gil on Instagram @CarlosGil8

https://www.entrepreneur.com/video/336136


ON1: Testing The Haze Slider

The Develop Module inside ON1 Photo RAW 2019 is the programs main engine. Under its Develop Module, there is a HAZE slider, located under the “Overall Settings” tab.

After adjusting other settings, moving the Develop Module Haze slider gives you two intriguing options. You can slide it to the RIGHT (+ plus numbers) to add Haze and a misty, dreamy look to your image. Or, you can move the slider LEFT, (- minus numbers), to clear up a low contrast fogged image or enhance the look of skies.

Testing

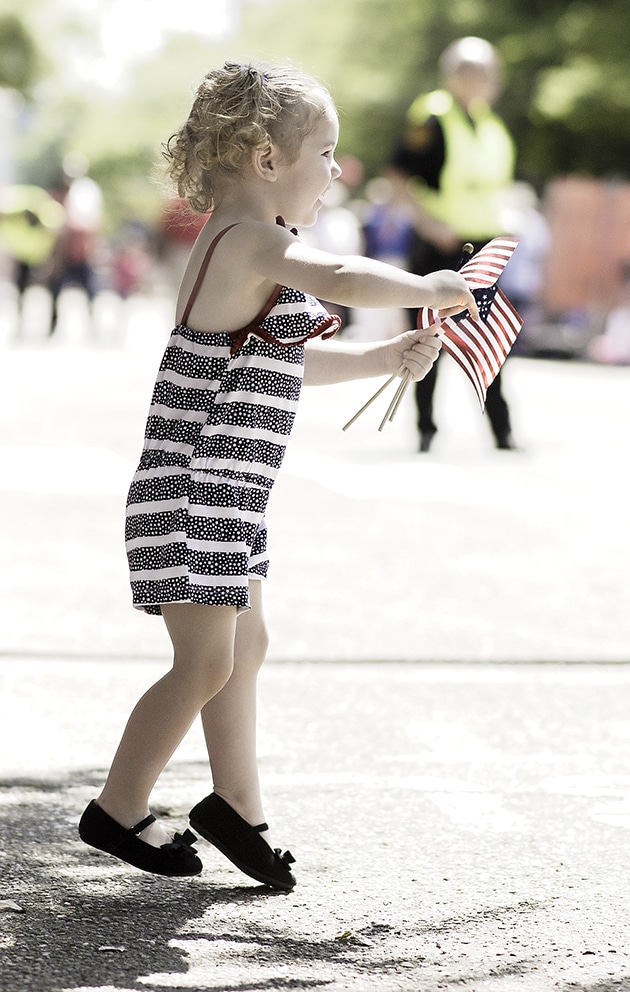
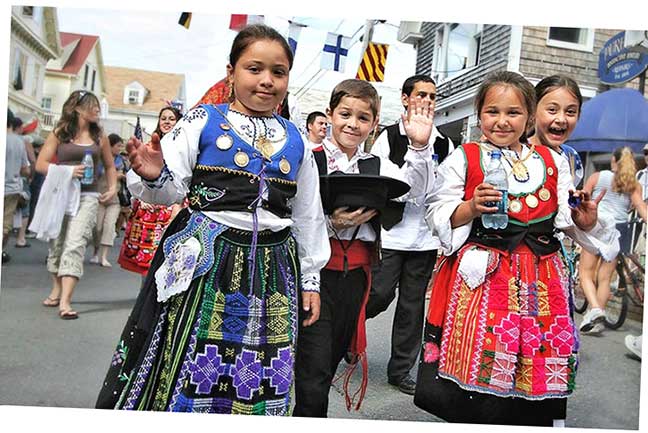
How effective is the Haze slider for photographs? To test its range of subtle to dramatic effects, I used the Haze slider images from the remote Bahamas. First, Haze was moved to the left. For another option, the Haze slider was moved right to add a touch of high key dreaminess to a picture of a little girl at a parade, at the end of this article. 

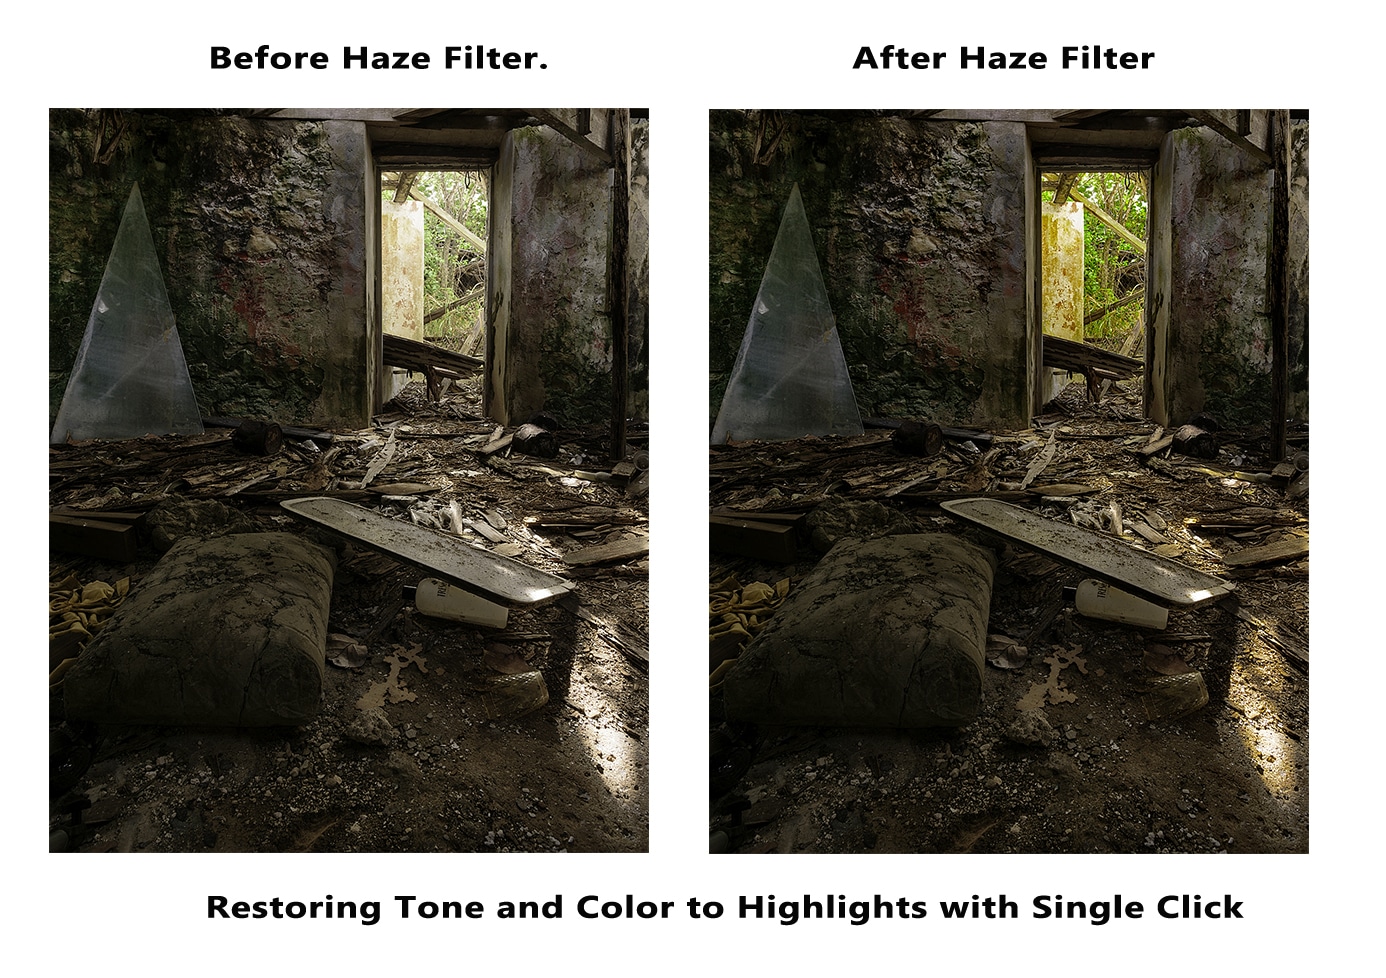
An abandoned basement in a lighthouse keepers’ home on a remote island. While the details were well-exposed, there was too much light coming through the doorway. The Haze slider took about 3 seconds to non-destructively edit and correct this. No other edits were done to this picture.

Most online tutorials show how to apply the HAZE slider to outdoor landscapes, but because the ON1 functionality is versatile, I first wanted to apply it to interiors by sliding it to the LEFT (-minus) to decrease haze and improve exposure. Sliding Haze to the left makes a picture clearer in a subtle way.

TIME: 2-3 minutes.

TOPIC: Improving images using the ON1 Haze slider.

LEVELS: Beginner and Intermediate.

SOFTWARE NEEDED: ON1 Photo RAW 2019 or 2018 is needed. If you download a free trial from ON1.com, you’ll need to import your photos from your device into the ON1 editor, before you can use the Haze slider in the Develop Module.

Decreasing Haze: The Steps

While most online tutorials show how to apply the HAZE filter to outdoor landscapes, the first test here was for interiors. Of course, you can remove low contrast haze or fog outdoors with this slider, but here we can see that  it works with interiors as well. Some more examples follow. They show what this versatile ON1 slider can do for you.

Steps In Brief:

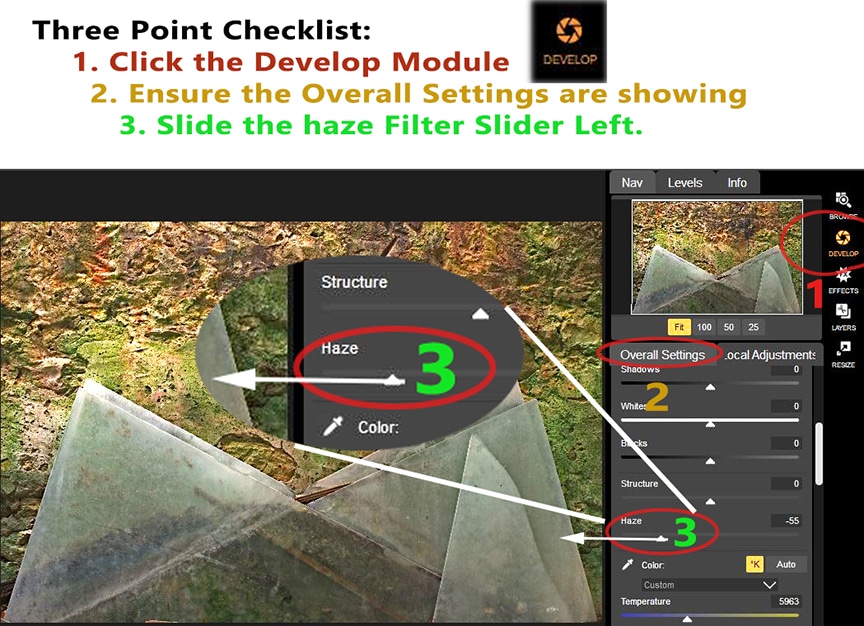
1. Import a photo. Open ON1.

2. Select the Develop Module.

3. In the Develop Module, select the tab marked Overall Settings; be sure you do not have the Local Adjustments tab selected.

Look down to the Haze Filter. Slide the filter left, into the minus range, to cut haze, boost color and improve tones in just one step.

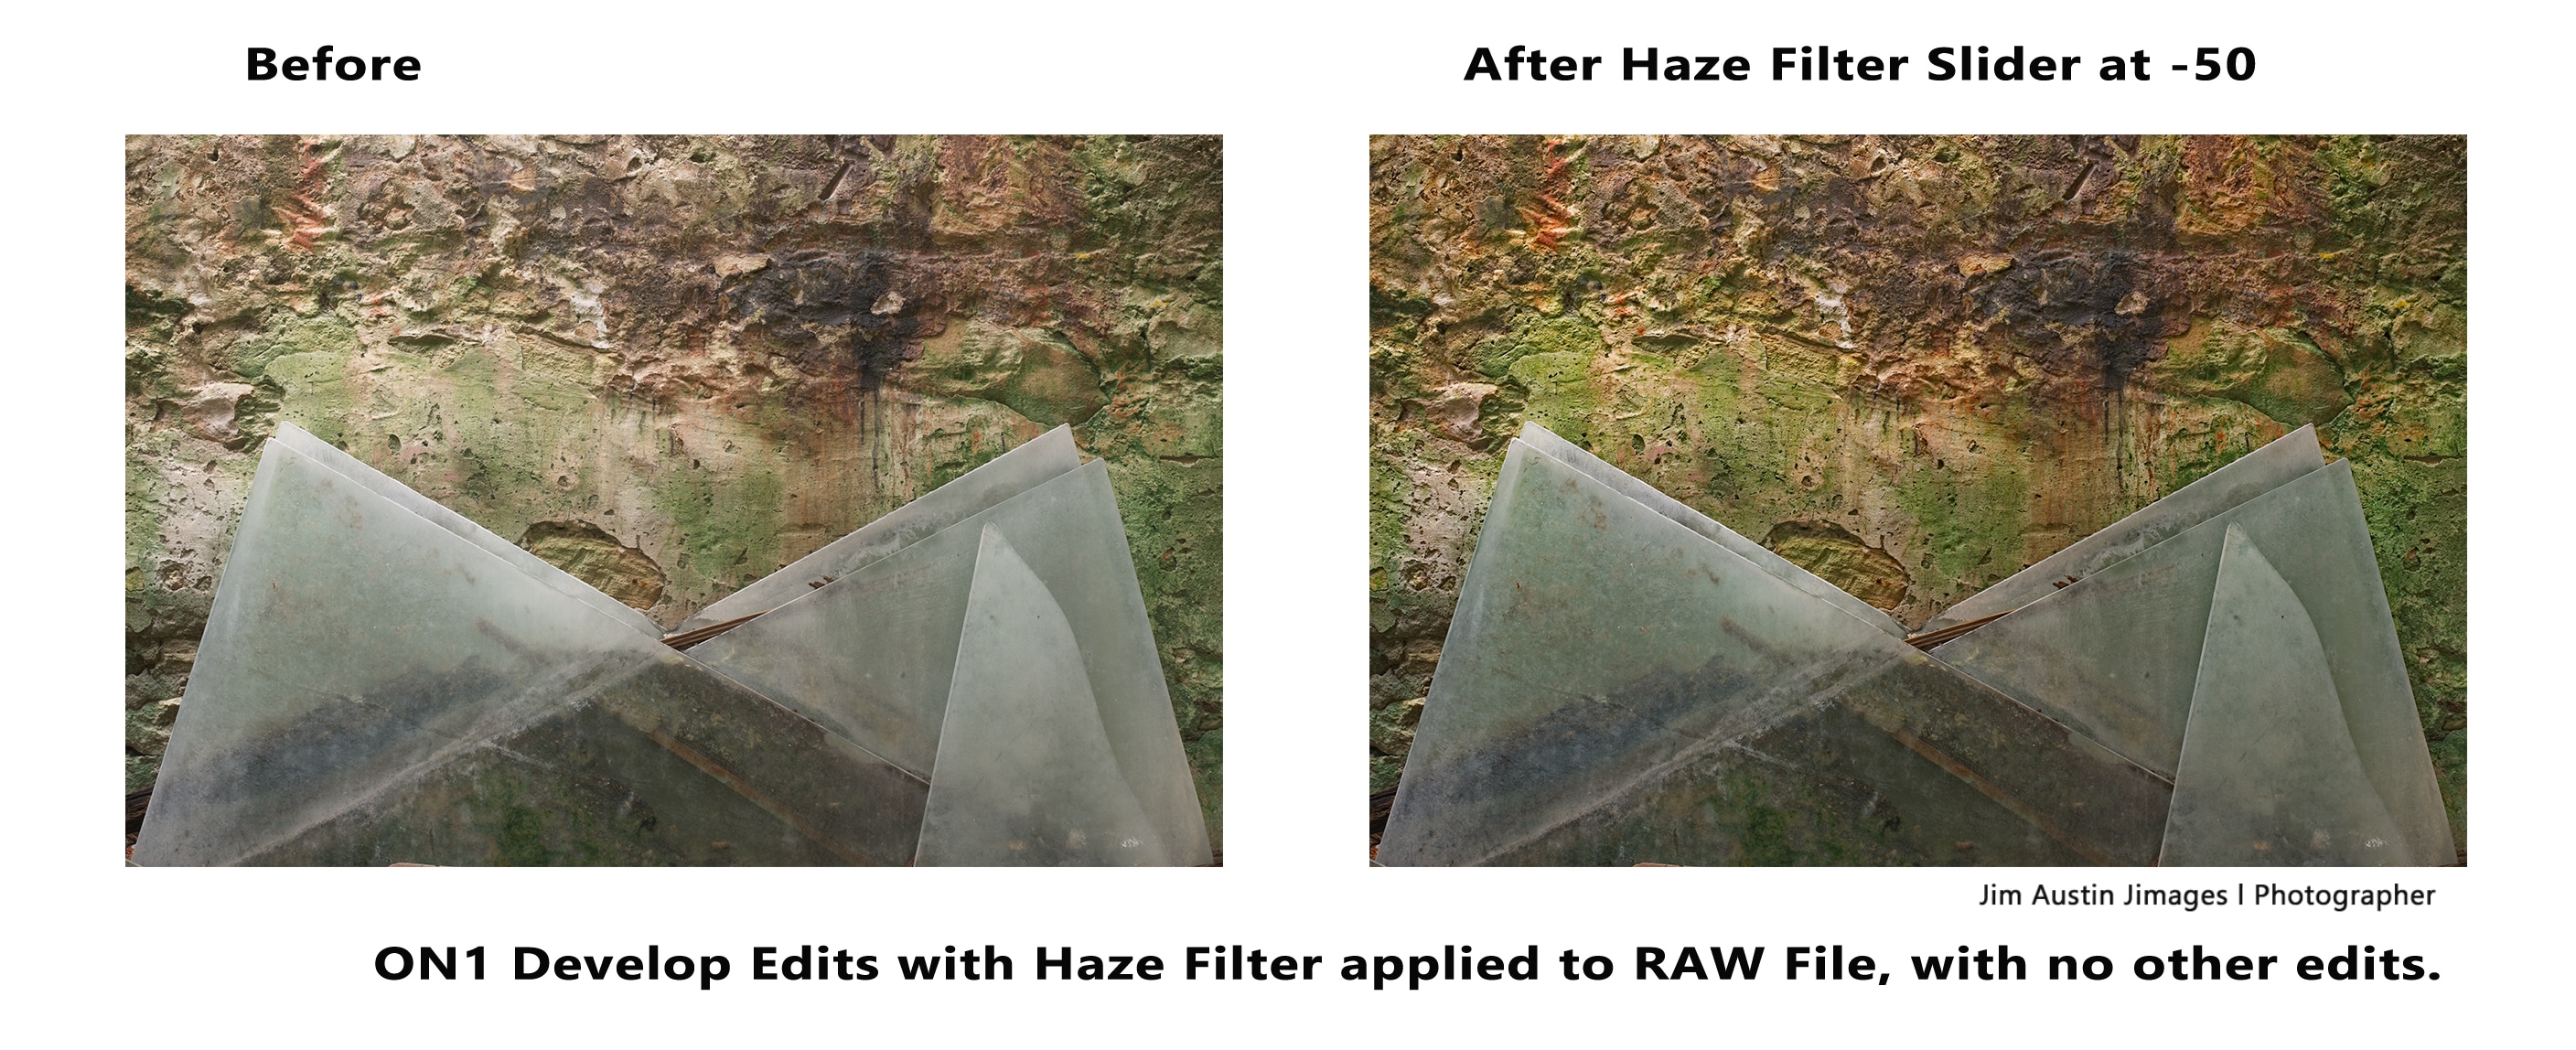
Above, a scene of a lighthouse window shows the Haze filter (-minus) improving color saturation outside a window without overly saturating the interior. Below, the HAZE slider (-) was applied to a RAW image of broken lighthouse tower glass leaning against a rough dark wall.

Adding Haze

As we can see in the following “Before & After” comparison, sliding the Haze slider right adds (+plus) a bit of a dreamy look to your image. First, here is a picture of a girl with no edits.

For the “after’ picture above, the Haze slider was moved the far right at (+80). The high key dreaminess may prove too far from reality, overly pictorial, but my point was to show what the Haze slider can do.

Final Thoughts

If you have ON1 Photo RAW, give the Haze slider a try. Download a trial. Even if you are new to ON1, you may have Photoshop, and you might discover how these two programs work synergistically. After a couple of years editing in ON1, I believe that its workflow enhances the power of PS to such an extent that the two programs combined form an effective and smooth workflow. ON1’s Haze slider is a fun instrument in your post processing tool set.

ON1: Testing The Haze Slider


Camera ISO – What Does it Mean?

camera iso meaning

Camera ISO forms part of the “exposure triad”, along with shutter speed and lens aperture. When used together, these three elements allow the photographer to control the brightness of a photo. Of the three though, ISO is often the one that beginner photographers find most confusing.

As you likely already know, shutter speed controls the amount of time that light falls onto a camera’s sensor – that’s pretty straightforward. Meanwhile, aperture dictates how wide the opening letting that light into the camera is. Once again, grasping this doesn’t present any huge intellectual challenge – at least once you’ve got beyond the counterintuitive f/ numbers. But what on earth is ISO?

This short guide to camera ISO will explain everything, in simple terms.

What Does ISO Mean?

The initials ISO stand for the International Organization of Standardization. This organization does not exist purely for photographic matters. Instead, its purpose is to guarantee dependable international standards in all areas of industry and commerce. This way, no matter where in the world you might be, you can be sure that standards of measurement remain consistent.

In the case of photography, ISO was first used to refer to the degree to which photographic film was sensitive to light. A  “slow” film, i.e., one rated at ISO 50 or 100, would need a relatively large amount of light in order to produce a correct exposure. Whereas a “fast” film, such as 800 ISO or 3200 ISO, would need much less light to produce an equally bright image.

Before the introduction of ISO standards, many different systems of measuring a film’s light sensitivity were used – such as ASA and DIN, among others. Even today, you may sometimes still see reference to ASA in the context of analog film technologies.

The benefit of ISO standardization is that a photographer purchasing 100 ISO film in one part of the world today can be certain that they can buy an identical product in another part of the world tomorrow, with no variation in performance. This way there’s no need to carry out expensive and time-consuming tests when changing to a different brand of film: you can just put the film in your camera and start shooting as per usual, confident of consistent results.

While relatively few people still use photographic film today, digital cameras also employ the ISO rating in order to measure sensitivity to light: in this case the sensitivity of the camera’s image sensor to the light coming in through the camera lens. This way, if you shoot with the same ISO settings on two different cameras, you can be sure that the results will be the same.

There’s one significant difference between film ISO and digital ISO though. Photographic film has a fixed sensitivity to light (i.e., if you put a roll of 100 ISO film in your camera, you stay using a 100 ISO film until the end of the roll). But the ISO of a digital sensor can be changed by the user between one shot and the next.

Why Change the ISO Setting?

Just as with aperture and shutter speed, the ISO setting you use will help to dictate the brightness of your photo. As you’re likely aware, aperture and shutter speed can be increased or decreased in increments corresponding to “stops” – with a difference of a full stop of light each time a value doubles or halves. For example, a shutter speed of 1/60 lets in twice as much light as 1/125, but 1/125 lets in twice as much as 1/250, etc.

It’s the same with ISO, only here sensitivity to light increases as the numbers rise. So, for example, 200 ISO is twice as light-sensitive as 100 ISO. And by doubling the camera’s sensitivity to light, you effectively double the brightness of the photo.

Ideally, we’d always get to shoot in situations where there is a lot of light. However, this isn’t always the way that things work out in photography. For this reason, it can be useful to be able to adjust the sensitivity of the camera to light when working in low-light situations, such as indoors, or at night.

However, as noted above, ISO is not the only determinant of brightness (i.e., exposure). Along with aperture and shutter speed, ISO forms part of the “exposure triad”: three separate but interdependent methods of controlling the brightness of a photograph.

The three members of the triad are not alternative methods of controlling exposure, though. Instead, they work together in tandem. So if you increase ISO from, say, 100 to 200, then in order to achieve an identical exposure you’ll need to compensate by either shutting down the lens aperture one stop, or by choosing a faster shutter speed.

However, each method also comes with its own collateral effects that will influence the final photograph in other ways beyond merely the brightness of the image. This means that proper use of the triad involves selecting the best combination of the three settings for the particular lighting conditions you are photographing in, and the final effect you desire for the photo.

Why Not Just Use the Fastest ISO Setting?

Every camera model will likely offer a different range of ISO settings. Most cameras come with 100 ISO as the lowest setting (i.e., the least light-sensitive setting). Users refer to this as the camera’s “base ISO”. Then, faster ISOs will also be available, usually going through 200, 400, 800, 1600, and 3200, depending on the model. With more expensive cameras, you’ll likely be able to shoot at ISOs of 6400 and well beyond.

As photographers, we frequently struggle to get enough light to take a shot. Given that a more sensitive ISO allows shooting even when there isn’t much light, why not just select the fastest ISO setting your camera will allow and leave it there?

Well, as useful as fast ISO settings can be, they come at a price. Analog film photographers paid this price in the form of increased grain when using faster films. So, for example, a 100 ISO film would produce photos that were very clean, detailed, and sharp looking. But in contrast, a photo made using 3200 ISO film would be incredibly grainy – indeed so much so that a lot of the finer details of the scene would likely be unrecognizable.

With digital cameras, it’s pretty much the same: only now it’s not grain that we see in photos made at faster ISOs, but digital “noise.” Either way, the result is an image that will not stand up to close inspection or a high degree of enlargement.

Aside from the problem of noise/grain, shooting at a higher ISO will also negatively impact the quality of your photos in other ways too. For example, both color rendering and dynamic range (i.e., the camera’s ability to capture the extremes of shadow and highlight areas) will be much better at low ISOs than at high ones.

All this means that upping your camera’s ISO settings should always be the last option, once you’ve already reached the limit with both shutter speed and aperture. So, for example, if you know that a particular shot really won’t work if you open up the aperture any further, and yet shooting at a slower shutter speed isn’t an option either, clearly the only solution at this point would be to shoot at a higher ISO.

Otherwise, though, you should always aim to shoot at the base ISO, or at least the slowest ISO you can get away with – as this will help to guarantee that your camera is shooting the best quality images it is capable of producing.

Even in dark environments, it will often be possible to continue shooting at a low ISO if you can use a tripod or prop the camera up on some other stable object such as a table or chair. This way you can select a slower shutter speed without the risk of blur caused by camera shake.

However, this will only be an option of the subject is static, as a moving subject will be blurred if the shutter speed is too slow. At this point, a change in ISO setting might be desirable. The question is, how fast an ISO can you get away with before image quality begins to suffer unacceptably?

Unfortunately, there’s no universal answer to this question. Different camera models will perform quite differently at each ISO setting. More expensive cameras – particularly those with full-frame sensors – tend to function much better at high ISO settings than entry-level models.

So while a beginner’s DSLR like the Nikon D3400 can produce admirably sharp images at 100 or 200 ISO, merely move up to 800 ISO, and the camera becomes almost unusable due to the enormous amount of digital noise present in photographs. Shoot at 800 ISO on a top of the range Nikon like the D850, and the results will likely look better than the D3400 can manage even when set at 100 ISO.

For most photographers, there will come the point where increasing ISO speed any further will result in images that are just too grainy to be worth taking at all. However, due to the degree of variation in high ISO performance between different cameras – not to mention the matter of personal taste – we can’t recommend any universal rule as to where this cut off point will be.

The only real solution is to try out your camera (or any camera that you are considering purchasing) at all ISO settings, and on a variety of different subjects, in different lighting conditions. If you can see that going beyond, say, 1600 ISO always results in a file that you find unacceptably grainy, then you know where the limit lies for you with that particular camera.

Bear in mind, though, that images shot at high ISO settings may look great when viewed on your camera’s LCD, but terrible once you get home and look at the image at a higher magnification on your computer. The only reliable way to test the ISO performance of a camera is by looking at the files closely in dedicated photo editing software such as Lightroom or Photoshop.

ISO and the Exposure Triad

Setting photographic exposure is always a kind of compromise. A negotiation. A process of give and take between the three elements of the exposure triad: ISO, aperture, and shutter speed.

There’s never just one single route to correct exposure. Indeed, a correctly exposed image can be achieved in numerous ways, by setting different combinations of these three elements. But while all these combinations may produce a good exposure for the subject, they will alter the photograph in other ways. Which of these combinations I should choose will ultimately depend on the final result I want to achieve with my photograph.

It’s a bit like building a house on a budget. If I build the house entirely from brick and stone, it will cost a lot of money, but will likely last a long time. However, if I go for brick and stone, then I’ll need to save some money elsewhere on the project to stay within budget. Meaning, that I might have to forget about having a swimming pool in the yard, for example, or that I will need to make the garage a lot smaller than I’d initially planned.

Alternatively, if I build the house using a wood frame, composite cladding, and drywall, the initial outlay for materials may be much cheaper than with stone. But the downside is that the house may not last as long before needing to be remodeled. However, if I go this route, perhaps I can also get a pool, a big garage, and put a jacuzzi in the bathroom.

Either way, I get to build a house for the same price. It just won’t be the same house. Which house I consider to be the “best” will depend on what my priorities are.

With photography, we are nearly always forced to work “on a budget.” But instead of being constrained by a financial budget, we must work with the limited amount of light available in any situation that we might want to photograph.

For example, if the light is low, but I know that I absolutely need a fast shutter speed to freeze action, then I’ll have to compensate elsewhere. In such a scenario, I have two possibilities available to me:

– One option is to open up the lens aperture to let in more light. But this will also have the side effect of reducing the depth of field. Depending on the photo I want to produce, I might be OK with this though.

– Alternatively, I can choose a faster ISO setting, which will make the image sensor more sensitive to light. But at the same time, this will also increase noise in the photo. Depending on what I want to do with the photo, I might be more OK with this than with changing the aperture.

Either way, I end up with a correctly exposed photo. Which photo I consider to be the “best” will depend on what my priorities are.

Final Thoughts

Camera ISO is an important element of the exposure triad, offering a third method of controlling the brightness of a photograph beyond just aperture and shutter speed. And, as with aperture and shutter speed, any changes made to ISO settings will also have collateral effects beyond merely lightening or darkening the exposure.

However, whereas increasing or decreasing depth of field, or creating motion blur due to slower shutter speed, are techniques that are often used in photography for artistic effect, few people find the increased digital noise caused by shooting at a higher ISO to be aesthetically pleasing.

Therefore the general rule with camera ISO is that you should only set it as high as you absolutely need to get the shot. Or, to put it another way, keep the ISO as low as you possibly can without it causing too much compromise in terms of aperture and shutter speed settings.

How high you can go with your ISO settings will depend firstly on your camera’s ISO performance, secondly on your subjective idea about what makes a “technically good” photograph, and thirdly on what you intend to do with that photograph (i.e., print it out as a huge enlargement? Or just look at it on your smartphone?).

Keep your camera at its base ISO setting most of the time, only moving to a higher setting when absolutely necessary. And don’t forget to switch back to base ISO once you’re done, or you may find that the next time you use your camera the results are unnecessarily noisy!

Camera ISO – What Does it Mean?


Understanding Focus in Photography

understanding focus in photography

Focus can make or break an image. And unlike other elements necessary for a successful photo, either the focus is perfect, or it’s not. You might get away with a slightly sloppy exposure; or your framing may not be 100% as you wished; even the lighting or timing can be less than perfect, and yet, all in all, it may still make for a stunning shot.

But if the focus is out, that’s it. There’s nothing to be done but hit the delete button.

Accurate and appropriate use of focus is one of the most basic – and yet most important – techniques you must master as a beginner photographer. There is nothing more frustrating than having produced an otherwise great photo, only to discover that the focus is slightly “soft” when the file is viewed at 100% magnification on a computer screen.

There are so many things that can go wrong when shooting a photo that you can’t control yourself – the sun, for example, or a subject’s behavior – that you’ll want to at least be fully on top of those elements which you can control. While even the pros produce a few out of focus shots from time to time, you can bet that the majority of their photos are tack sharp, without even thinking about it. That’s what you should be aiming for too.

However, focus is much more than merely a minimum requirement for producing a technically acceptable photo. Deliberate and considered use of focus is also one of the most important creative tools in your photographic arsenal, helping you to lead your viewer towards what – for you – are the most important elements of the image, and away from those that you’d rather they didn’t concentrate on. How you use focus can also radically alter the mood of a photo, shifting the atmosphere from clinical clarity to atmospheric visual poetry.

But to make full use of these techniques, you must first gain a solid understanding of how focus works, which is precisely the purpose of this guide.

What Do We Mean By Focus in Photography?

First, though, it would be beneficial to define exactly what we mean when we talk about focus in the context of photography.

Shine a light on a wall and place your hand between the wall and the light source, at a distance of a couple of feet from the wall. You should see a recognizable shadow of your hand on the wall. Notice, though, that the edges of the shadow are not sharply defined, but are instead a little soft and diffused. But move your hand closer to the wall, and the shadow becomes sharper, its form less fuzzy. Now place your hand just a fraction of an inch from the wall, and the shadow will become very sharply focused.

If instead, you move your hand in the opposite direction, much closer to the light, the shape of the shadow will become less and less defined until it may not be recognizable as a hand at all. The shadow is now totally out of focus.

Although you may not be conscious of it, in order to read this article, your eyes have focused on the screen of your device. Keep them looking here, entirely concentrated on the text, but see what else your eyes can take in around your device – whether in the background or foreground. Probably you can recognize other objects in the environment around you, out of the “corner of your eye.” But notice that anything either in front of or behind your device appears somewhat fuzzy and unclear compared to the text on the screen.

Now move your eyes to one of those objects in the background or foreground and try to get a better look at it, allowing your focus to shift from the screen to the object.

We lost you for a second, right? And in order to continue reading this, you will have had to move your eyes back to the screen to make the text sharp and legible again. If you tried to read the screen while keeping your eyes on the background, you will likely have gone cross-eyed, ending up with a double image of the screen.

A camera lens works in the same way. At the most basic level, not everything in front of a camera can be in focus at the same time in a single photo. Or rather it can, but you’ll need to know how camera focus works in order to be able to achieve this. That’s what we’ll be looking at in the first part of this article.

But then there’s the question of whether you will even want to make the entire image sharply focused, or instead carefully control which parts of the image are focused and which are not, for creative effect. We’ll get to that a little later on, towards the end of the article.

Camera Focus: Technical Considerations

How the Camera Focus Works

Your camera has a lens. This lens is used to capture rays of light from outside in such a way that they precisely converge on the camera’s image sensor, creating a sharp image. The sensor itself likely has a great many focus points which can be used to tell the lens to focus on a specific object within a scene – i.e., at a specific distance from the camera. Now not only the object we’ve focused on, but all other objects positioned at the same distance from the camera, will be sharp. This arc of sharpness, including all parts of the image that are in focus, is called the focal plane.

Decades ago, cameras could only be focused manually, by turning a ring on the lens barrel until the optical elements inside the lens were positioned in such a way as to provide sharp focus at the desired distance. Today many DSLRs, Mirrorless, and other types of cameras still offer the possibility to focus manually in this way. Of these, some are truly manual, just like with an old film camera (i.e., adjusting the focus ring will directly and mechanically move the lens elements). Meanwhile, others are effectively a simulated version of manual focus. Such systems are often called “focus by wire.” Here touching the focus ring does not mechanically move anything in the lens directly, but instead sends information to the camera body; which in turn tells the motors which control the lens elements to move, electronically.

While manual focus operation certainly has its uses (particularly in macro photography, for complicated rack focusing in video, or when focusing in very low light), from the late ‘80s onwards nearly all cameras have come with some form of autofocus capability. Since then, autofocus technology has improved considerably, and there are now a primary couple of methods in which cameras achieve focus automatically.

Phase Detection Autofocus

Employed by all DSLRs. Also used by some Mirrorless cameras.

Phase Detection autofocus splits light entering a camera lens into two identical images, which are then phase-corrected (i.e., realigned) by the camera in order to determine correct focus distance. As this process initially required a mirror in order to split the light beams, it is most commonly found in DSLRs. However, despite lacking a reflex mirror, more recent models of Mirrorless camera sometimes also employ this method, by incorporating the beam splitter into the image sensor.

Phase Detection autofocus provides detailed information about the distance of the subject from the camera and is therefore well-suited to focus-tracking fast-moving subjects, where continuous rapid adjustments of focus in small increments are typically required.

Contrast-Based Autofocus

Employed by nearly all Compact cameras, many Mirrorless cameras, and by all DSLRs when used in Live View mode.

When a scene is out of focus, one object will seem to blend into the next, without any clearly defined forms, contours, or details. Conversely, when an object or a part of a scene is in focus, there will be a maximum degree of contrast between all its finer details and contours. Contrast-based autofocus uses this knowledge to determine when an area of a scene is in focus: depress the focus button of your camera and the focus sensor will adjust the position of the lens elements until maximum intensity of contrast is achieved in the selected area of the frame – thus assuring that this part of the image is sharp. However, as this method of focusing does not produce any information regarding the distance between camera and subject, it is less suited to the tracking of moving subjects.

These two methods of focusing work in entirely different ways: the first measures distance, providing the camera with an understanding of the relative positioning of elements within the frame; the second merely adjusts the lens elements until maximum contrast is achieved, but cannot differentiate between objects positioned on separate focal planes.

In practice, both systems have their advantages and disadvantages, and therefore, it is common for modern cameras to employ both methods. Sometimes these methods work together simultaneously: for example  Phase Detection may be used to set focus to an approximately correct distance, at which point Contrast-Based autofocus kicks in, fine-tuning focus for greater accuracy.

At other times the different methods are used separately and for different purposes. This is notably the case with DSLRs, which use the Phase Detection system as their primary method of focusing, but must switch to using Contrast-Based AF when operating in Live View mode, due to the fact that the reflex mirror – upon which the use of Phase Detection AF depends – is no longer accessible.

When assessing a scene, the human brain looks for a variety of “clues” – both visual and otherwise – that help it to understand three-dimensional space and the distance between objects. Despite being equipped with a highly sophisticated computer, a camera is not capable of understanding all these signs regarding spatial information but instead relies upon the detection of small, contrasty details within the scene in order to understand which parts of the frame contain objects. This means that autofocus often struggles in situations where the subject lacks contrast (for example, a textureless wall, or a cloudless sky) or where there is insufficient light available to differentiate between one detail and the next.

Autofocus Area Modes

Whereas early models of autofocus cameras often featured just a handful of autofocus points – or perhaps even just a single one in the center of the frame – modern cameras often feature many more autofocus points distributed across their sensors, providing much greater accuracy. These focus points can be used in a variety of different ways, depending on the shooting situation.

Single Point AF

In Single Point autofocus mode only one of the camera’s autofocus points is active. Pressing the focus button will cause the lens to focus on this exact point within the frame. The user can decide precisely which point is active through the camera’s menu.

Dynamic Area AF

As with Single Point AF mode, in Dynamic Area mode, just a single autofocus point is selected. However, other nearby focus points will also be active, allowing the camera to make adjustments to focus should the subject move slightly within the frame. The user can decide the precise range of autofocus points in use through the camera’s menu.

Auto Area AF

In Auto Area AF mode, the camera makes all decisions regarding focus for the user. While this may seem like an appealingly convenient option, in practice the camera is as likely to get things wrong as to get them right, often leading to the focus being set on an entirely incorrect area of the frame.

Types of Focus Point

Different camera models use different types of focus point. “Normal” focus points can detect only vertical lines and are the most commonly available type of focus point. Increasingly though we see cameras using a large number of Normal focus points, augmented by a range of more sophisticated “Cross-Type” focus points in certain areas – particular towards the center of the frame. Cross-Type AF points are capable of detecting both horizontal and vertical lines and therefore provide greater accuracy than Normal points.

Frequently camera manufacturers will not only state the number of focus points a particular model of camera offers, but also, of these, how many are the more desirable Cross-Type points.

Camera Focus Modes

Typically a camera will offer different focus operation settings, either by means of a physical switch on the camera body or the lens itself or by way of the camera’s LCD menu.

Manual Focus

Focus must be set by manually turning a ring on the lens barrel.

Single Shot AF

Depress the shutter button halfway, and the camera will set focus. Once focus is set, this position will be held until the shutter is fired, at which point the shutter button must be half depressed again in order to reset focus.

Continuous AF

As with Single Shot AF, depressing the shutter button halfway will set focus. However, the camera will continue to adjust focus if either the camera or the subject moves before a picture is taken. This makes Continuous AF ideal for tracking fast moving subjects.

Back Button Focus

Normally, when you purchase a new camera, its standard factory settings will place focus control on the shutter release button: half depress the shutter and AF will spring into action. On many camera models, however, this is a feature that can be customized, with the user able to assign AF control to another button of their choice – typically a custom function button on the rear of the camera whereby AF is set using the thumb rather than forefinger.

Many photographers prefer this set-up, as it keeps focus entirely independent from the shutter release. Meaning that focus can be set, and will stay in place even when repeatedly shooting, without the risk of the focus position changing each time the shutter is fired.

Focus Range Limiter

Some lenses come with a Focus Limiter function, typically selectable by means of a button on the lens barrel itself. This feature allows the user to restrict focusing to a predetermined (and often fully customizable) distance range.

The advantage of this is that, if you know that your subject (even a moving subject) will remain at an approximate distance from the camera, you can tell the lens only to look for points to focus upon within this distance range. This way, there is much less risk of “focus searching” wherein autofocus jumps backward and forwards between foreground and background objects looking for a point to focus on.

Lens Calibration

Although you might expect a manufacturer to ship your new camera fully set up for optimal focusing performance right out of the box, many photographers and manufacturers alike recommend calibrating DSLR bodies to their lenses for improved accuracy. Indeed, you will frequently come across terrifying articles online telling you that you must do this; otherwise, your photos will all turn out terrible.

However, as alarming as this may sound, the majority of professional photographers go through their entire careers without ever having calibrated a lens. Lens calibration will, of course, be beneficial, but for those photographers less concerned with “pixel peeping” every technical deficiency, and more interested in just producing good photos, obsessing over such details might not be worth the bother (however, see the troubleshooting section below for an example of when you may need to calibrate).

Camera Focus in Practice

Having gained an understanding of how a camera sets focus, we now turn our attention to to how focus works in practice.

Visual Depth

A photograph is a two-dimensional object, yet always represents three-dimensional space. This being the case, we need to have some understanding of how those three-dimensions behave when reduced to just two.

When we refer to the depth of a scene, we are referring to the visual clues that tell us about the size and shape of objects and the distance between them in three-dimensional space. A sheet of paper has almost no depth when viewed front-on: hold it out in front of you vertically, or lay it on a table and look at it from directly above, and its entire surface will be more or less on the same plane; i.e., the same distance from you.

But lay the paper horizontally on your hands and lift it almost to the same height as your eyes, and one edge of the paper will be much closer to you than the other. Consequently, its surface will no longer all be on the same plane in relation to you, but will instead recede into the distance.

Behind the paper, there will likely be other objects in your field of view, and perhaps a wall beyond them. Maybe there’s even a window in the wall, providing a view of the outdoors? In which case, the scene has much greater visual depth than if you were merely looking at a sheet of paper laying flat on a table.

Continue to hold the sheet of paper horizontally on the palm of your hand with its surface receding into the distance, but hold it as far away from you as possible now. You will likely be able to visually take in the entire sheet of paper from front to back. And – providing that the typeface isn’t too small – if there’s anything written on the paper you will probably be able to read it without having to move your eyes too much.

Now move the paper so that its closest edge is almost touching your nose. If you’ve got good eyesight, you’ll probably have no problem moving your eyes so that the edge furthest away from you is sharply focused.

But what about the nearest edge? Can you focus on it? And can you focus on both the nearest and the furthest edge at the same time? The background too?

Cameras also struggle with this.

Depth of Field

The degree to which a camera can capture all the elements of a scene in focus, from foreground to background, is called depth of field. If the distance between the closest and furthest objects in an image that is acceptably sharp is relatively small (i.e., only a narrow portion of the image is in focus), this is called a shallow depth of field. Conversely, if there is a considerable distance between the closest and furthest elements of an image that are sharp (i.e., both objects close to the camera and those much further away are sharply focused), this is called deep depth of field.

Several different factors influence the depth of field of any given photo. Indeed depth of field is a complicated topic that deserves a separate guide all of its own. Nonetheless, we’ll need to acquire at least a basic understanding of depth of field if we are to make effective use of focus in our photography.

As you probably already know, changing the lens aperture (f/stop numbers, such as f/2.8, f/11, etc.) opens or closes the lens diaphragm, letting in either more or less light. But because changing the size of the hole through which light enters your camera also changes the angle at which light enters, changing the lens aperture affects depth of field too.

A wide aperture (i.e., a low f/stop number such as f/1.8 or f/2) causes light to enter the lens at a steep angle, contributing to a shallow depth of field. Meanwhile, a small aperture (e.g., a high number such as f/16 or f/22) forces the light to enter the lens and hit the camera’s image sensor at a more horizontal angle, leading to a deeper depth of field.

Although opening or closing the lens diaphragm always affects the depth of field, it is unfortunately not the only determinant of the depth of field. Indeed, our ability to control depth of field is made more complicated due to the fact that a number of other considerations also influence it. These include:

Lens focal length

A wide-angle lens (such as a 24mm or 28mm) will produce a fairly deep depth of field at nearly all aperture settings; while a telephoto (e.g., a 200mm or 300mm) lens will always produce a much narrower depth of field than the wide-angle lens, even when the two are used at identical aperture settings.

The relative distance of the camera to subject vs. subject to background

Simply put, if you focus on a subject that is closer to the camera than the background, the background will be out of focus. But focus on a subject that is closer to the background than the camera, then both subject and background are likely to be fairly sharp.

The sensor size of your camera also influences depth of field: the bigger the sensor, the shallower the depth of field that can be achieved using that particular camera. But as this is not something that we as photographers can control (beyond choosing to use a particular camera rather than another) we will not go into this matter in any greater detail here. Just bear in mind that if you feel that you have understood everything we’ve covered so far in this guide, and yet you are still struggling to achieve a very shallow depth of field in your photographs, the most likely explanation is that you are using a camera with a “cropped” (i.e., not full frame 35mm) image sensor.

To recap then, depth of field refers to the degree to which objects in front of and behind the main point of focus are also sharp. So, for example, if I focus my camera on a house but both the hill behind the house and a tree in front of it are also relatively sharp, we would say that this is a deep depth of field. If, on the contrary, only the house is sharply focused, but both the hill and tree are blurred, we would refer to this as a shallow depth of field.

It is important to note that the distance in which objects that fall to the front of the plane of focus will still be sharp is smaller than the distance for which those located behind the plane of focus will be sharp. The distance from the nearest acceptably sharp object to the central point of focus makes up just a third of the depth of field. Meanwhile, the distance from the point of focus to the furthest acceptably sharp object makes up the remaining two-thirds of the depth of field. The importance of this observation will become clear in just a second.

Hyperfocal Distance

When shooting a landscape photograph, we generally want as deep a depth of field possible, so that ideally all elements in the frame are acceptably sharp from background to foreground.

Let’s say that we are photographing mountains. We usually want the focal plane (the point of maximum sharpness) to be on the subject. Here the subject of our photo is the mountain range, which is so far away that in order to correctly focus for them we would need to set the lens to infinity (i.e., the furthest point at which the lens can focus). Is that what we should do?

Actually, no.

Remember that one-third of the depth of field extends in front of the point of focus, while two-thirds extend behind it. This means that if we set focus on the mountains – at infinity – we will only benefit from one-third of the depth of field potentially available to us: i.e., the portion in front of the mountains. This is because the other two-thirds of our depth of field will be beyond the mountains. But it’s only possible to focus up until infinity anyway, so all that depth of field beyond the mountains is going to waste where it makes no difference to the sharpness of any element visible in our photo.

In short, you should never focus at infinity unless you specifically want a single object at infinity to be in focus at the expense of all other elements within the frame. Instead, in most cases, you’ll want to focus at the hyperfocal distance for the scene you are photographing.

Hyperfocal distance refers to the point furthest forward within a given scene on which you can focus and still get everything beyond that point acceptably sharp all the way to infinity – while of course also benefiting from the remaining third of the depth of field-stretching forwards from the focus point towards the camera.

As hyperfocal distance depends on a great many variables (distance, lens, aperture, etc.), precisely calculating hyperlocal distance involves some pretty complicated math, so it’s much simpler just to use a dedicated app to do the job for you. In a pinch though, you can probably get away with guessing it, by using a very small aperture and shifting your point of focus somewhat forwards of infinity.

Focus vs. Depth of Field vs. Sharpness

Up until now, we’ve put a lot of emphasis on the concept of depth of field in relation to focus. However, it is important to understand that the terms focus, depth of field, and sharpness do not refer to the same thing.

• Sharpness refers to the degree to which elements within an image are clearly defined, showing maximum detail and with a strong contrast between their edges. How sharp a given photo is depends on various factors, including the quality of the lens, the size and resolution of the camera’s image sensor, the aperture used, etc.

The point of focus (or focal plane) is where the optical elements within the camera lens have been set to provide maximum sharpness of all objects positioned at a given distance from the camera. Objects either in front of or behind the point of focus will become less sharp when moving away from the point of focus.

The degree to which sharpness decreases when moving away from the point of focus is referred to as depth of field. As already mentioned, whether the depth of field is deep or shallow depends on a variety of interrelated factors.

The reason that we need to be clear about these three different points is because we are about to introduce a further concept that will likely seem counterintuitive after all that we’ve said so far about maximum depth of field being achieved at the smallest aperture settings (f/16, f/22). Before we throw this spanner into the works though, let’s be clear: if f/22 is the smallest aperture that your lens offers, this will indeed produce the deepest depth of field achievable with that lens. However, what we also need to understand is that shooting at f/22 may not produce the sharpest photo possible with that lens.

What does this mean? Well, remember that depth of field specifically refers to the degree to which objects in front of and behind the point of focus are also in focus. So at f/22, most objects in the frame, all the way from foreground to background will likely be relatively in focus. But this doesn’t necessarily mean that they will be sharp – sharpness referring not to the depth of field, nor how well the camera has been focused, but to the optical rendering and resolution of the image.

Sharpness is independent of both focus and depth of field, and in terms of image sharpness, most lenses perform at their best when used at medium apertures – i.e., not at either their maximum or minimum apertures. Although every lens is different, typically a lens will produce the sharpest results approximately somewhere between f/5.6 and f/16.

This means that sometimes you will need to make a decision as to which is more important: deep depth of field, or maximum image sharpness.

For example, if all I care about is achieving a very deep depth of field, so that the whole image is in focus, and I don’t mind losing a tiny bit of resolution, then shooting at f/22 will be the best option.

However, perhaps I plan on making a very large print of the photo. In which case, I might decide that it’s more important to achieve maximum sharpness. As long as I don’t mind compromising slightly on the depth of field in order to get it, then I might get better results shooting at f/16 or even f/13.

Creative Use of Focus in Photography

Up until now, we’ve primarily spoken about ways to achieve a “correctly focused” image by the application of technical knowledge. However, as with so many things in photography (and indeed other art forms), “correct” is a somewhat subjective term. There are certainly many recommended ways of approaching focus that are widely considered appropriate to different types of photography. But this isn’t to say that you must follow these recommendations every single time. Sometimes a photo can be successful precisely because it plays with the viewer, confounding their expectations.

Nonetheless, for the most part, there are good reasons why certain types of photographs are commonly shot in a particular way. You should certainly be aware of how other photographers approach the kind of images you are interested in shooting, but then it’s up to you to decide what works best for the exact image you want to produce; for the exact message you wish to convey, or atmosphere you want to evoke with your photography. Creative use of focus can play a big part in this.

Where to Focus?

When approaching a shot, any shot, your first questions should always be “what’s the subject here?” All your creative and technical decisions – from focus to angle, framing, and exposure – hinge on the answer to this single question.

Sometimes identifying the subject of a photo can be more difficult than it sounds. Especially when it’s the kind of wide view where it was more the general overall impression of the scene that first caught your eye, rather than any single detail in particular. For example, a busy street or a landscape scene.

Even in such cases, there will always be one element of the scene that is key to the success of the whole image. If in doubt, just ask yourself what is the first element of the scene that you want your viewers to notice when they look at the photo. This is likely the subject. Ninety-nine times out of a hundred, you’ll want to focus here.

Occasionally though – especially when using a narrow depth of field – you may want the viewer to have to work a little harder to understand what’s happening in the image. So don’t entirely rule out the possibility of focusing elsewhere, drawing the viewer’s attention to a secondary (but important) object in the frame, and then leaving them to make sense of what’s happening in out of focus areas; which may, in fact, contain the real subject of the photograph.

As already mentioned, there are certain tried and tested approaches to focus in photography that generally produce the best results. If you are creative, rules are certainly there to be broken. But you’ll need to fully understand those rules, and the reasons why they have achieved that status, before you can think about deviating from them.

There now follow some suggestion as to how you might best approach two of the most common photographic genres in terms of focus. If interpreted fairly liberally, these two genres cover most photographic scenarios you are ever likely to encounter.

Landscape Photography

Landscape photography is probably the genre of photography which most values a deep depth of field. The reason for this is straightforward: if you have a wide landscape scene, one particular element (a mountain, a tree, a rock) may provide the central point of interest and will probably be where you should focus, but it’s also quite likely that the rest of the landscape is of almost equal importance. If you use a shallow depth of field to draw attention to just one feature of the landscape, leaving the rest of the scene without sharp definition, viewers will likely find this quite disturbing, as there is nowhere else for the eyes to settle on as they scan across the rest of the image.

This problem becomes even more acute when a landscape photo is printed up as a big enlargement (for an exhibition, for example). Why produce such an enormous view of the landscape if so little of the image contains useful (i.e., sharp, recognizable) visual information? If instead, the image is fantastically sharp from front to back, the viewer will be free to explore every minute detail with great pleasure.

Although other genres of photography such as interiors and architecture differ from landscape photography on a number of other points, when it comes to the matter of focus, much of the advice commonly given for landscape photography holds equally true. There are certainly many cases in which a shallow depth of field may work very well in either an architectural or an interior shot, but these will inevitably be for photos of the more artistic kind. But for more practical uses, a deep depth of field and setting focus on a pivotal element of the scene will produce the best results the majority of the time.

Portrait Photography

Portrait photography lies at the other end of the extreme to landscapes. Here a shallow depth of field is usually more desirable. The reason here is that, in contrast to a landscape which is often more about providing a general view of a scene, a portrait has a very clear subject that makes all other elements within the frame pale into insignificance. That subject is, by definition, of course, a person (or an animal).

The subject of a portrait is even more narrowly prescribed than this: while a portrait is always about a person, when we view a person we generally look at their eyes. And in almost every single case, this is where you’ll need to focus, or risk severely frustrating the viewer.

But what happens when you’re photographing more than one person in a single shot? Here, you will still need to focus on somebody’s eyes. The question is, whose eyes?

If it’s obvious that one of the people you are photographing is more important for one reason or another, then clearly it should be this person whose eyes are sharply focused. But if you have two or more individuals who are all of equal importance, you face a choice of either focusing on the person nearest to the camera, lining everyone up on the same focal plane, or shooting at a smaller aperture setting for a deeper depth of field.

Other Photography Styles

With other genres of photography such as reportage, street photography, still life, travel, etc. whether you opt for a landscape or portrait kind of approach to focus will largely depend upon the precise nature of the image you wish to create; the intended final use or audience; and the precise atmosphere you want to achieve.

Focus is a subtle way of manipulating your viewers, drawing their attention to the information you want them to see, in the order you want them to see it. For this reason, it is one of the most valuable tools in a visual storyteller’s kit bag, and consequently, your approach to focusing should never be taken for granted.

Nonetheless, any photo you might conceivably want to shoot will fall somewhere between the two main approaches characterized above.

Why Aren’t My Photos Sharp?

Are you problems with focus? Use this checklist to identify the cause.

Problem: The photo is sharp, just not where you want it to be.

Likely causes:

•  Either you or the subject may have moved after you set the focus. This can often happen when setting focus, using focus lock, and then recomposing the shot before firing the shutter. If you’re shooting with a wide aperture, depth of field may be so shallow that even altering your position an inch or two when reframing can result in an out of focus subject.

If focus control is assigned to the shutter release button, you may have accidentally refocused before firing the shutter.

If your lens has a Focus Limiter function button, check that this is in the off position. It may be blocking your lens from focusing at the correct distance for your subject.

If you are shooting a portrait at a very narrow depth of field, check that the subject is fully facing the camera front-on: if their head is turned half in profile, one eye will be further away from the camera than the other, potentially resulting in one eye being sharp while the other is blurred. Generally, you will want to focus on the eye closest to the camera; the only exception being if this eye is in deep shadow, in which case it may be better to focus on the eye that is further away.

• If static parts of the image are sharp while moving elements are blurred, this is not a problem of focus, but instead caused by shooting at an inappropriately slow shutter speed.

• Your lens may need calibrating.

Problem: No part of the photo is sharply focused.

Likely causes:

• Again, check that the Focus Limiter function is off, as this could be stopping your lens from focusing at the correct distance for the subject.

• This may not be a focus problem at all, but could instead be caused by movement or vibration of the camera while making the exposure. If you are hand-holding your camera, check that you are using a sufficiently fast shutter speed. Use a tripod if necessary. Even if using a tripod, strong wind or other vibrations may cause photos to become blurred.

• Alternatively, if the image seems soft, grainy or pixelated, the problem may have nothing to do with focus but instead be a simple case of poor image quality, This could either be caused by severely underexposing the photo, using too high an ISO, or may just be because of a small, low-resolution image sensor.

Understanding Focus in Photography


Five Ideas From Field to Final Print

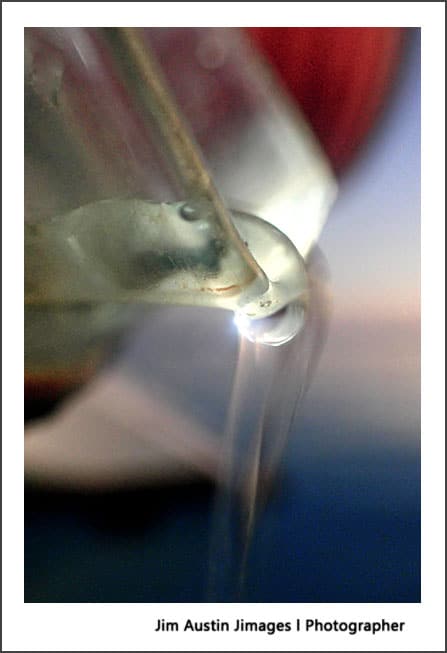
PHOTO 1: Pouring water from a pitcher.
PHOTO 2: Ancient cathedral nave after a rain.
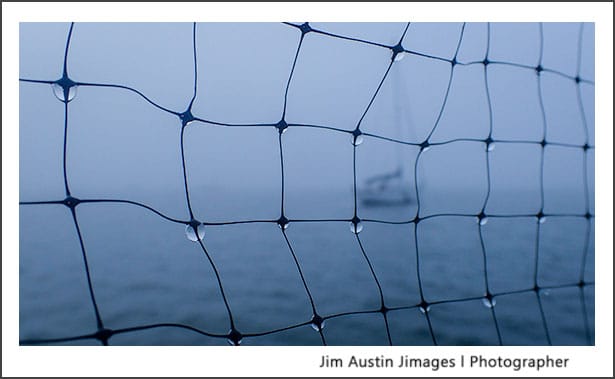
PHOTO 3: Webbing on my sailboat.
PHOTO 4: A Bahamas needlefish in shallows.
PHOTO 5: Piling from a dock to waters where a fish school gathers on a cloudy day.

Ideas and Exercises to Expand Your Thoughts on Your Photography

LEVEL: Beginner, Intermediate, Enthusiast.

THEME:  Water is a coherent theme for the five images above.

#1 – Single Color

Choose a single color. Practice photographing that color, and its complimentary hues, for at least four outings. I chose the color blue. It is a dominant color, and I spent part of the time in the Bahamas, where a billion shades of blue emerge from sky and water.

For this exercise, it’s OK to include contrasting hues that harmonize with your main color. The colors red and yellow are complimentary to blue and provide a balance.

The joy of this color exercise is thinking outside our color boundaries. How we label changes how we see. For example, in some cultures, light blue and dark blue are two different colors and given completely different names.

Our color concepts limit how we perceive our visual experience. Paying attention to just one color, and those hues that harmonize with it boosts our appreciation of how we see hues. This takes, time; the longer we look, the more textures we can find within a single color.

Avoid the “Max Slider” approach; overly-saturated color can become the visual equivalent of screaming. Too much saturation detracts from the form, space, and line that are part of a good composition. Initially, try to avoid photographing “off-balance” colors. Colors that are in balance, together, resonate with each other like two tuning forks.

#2 – Commit & Go

Decide, the night before a shoot, that the next mornings’ sunrise will be unique and beautiful. With a positive, energized attitude, dress for the conditions outdoors. Go out to photograph no matter what the weather is like, being mindful of the light and weather that is present, not the conditions you expected.

#3 – Change Position

Look up, down and inside things. Shift your perspective to get lower, higher or closer. Ask yourself: “how would a 3-year-old see that dog, or how could an eagle view that cliff, or how might would a butterfly see that river?” The reason to vary your camera height and position is simple. By overcoming a habit of making shots from a standing position at eye level, we can see a greater variety of compositions.

Next, go even deeper. Change the process of how you make images. Do you habitually check your LCD screen? Turn it off. If you often take 5-10 shots of a single thing, take only one frame of each subject.

Give your workflow a little nudge. Do you place a high value on photographs that are sharp from corner to corner? Then experiment with softness and blur. If you tend to spend just a few minutes with a subject, invest more time and spend 30 minutes or longer looking, gazing and absorbing just a single subject matter.

The reason behind all these methods of shifting our position, and taking time, is to expand our awareness of how we compose. This means investing time finding new vantage points and angles in search of compelling pictures. This is often more valuable than any piece of gear.

#4 – Simplify Your Gear

I like to make solo trips with only one camera body and one lens. This keeps me from overshooting, lets me concentrate on light, timing, and composition. For landscape and still subjects, instead of zooming or auto-focusing, I set the camera settings to Manual mode. Wielding a prime lens minimizes the time spent on focusing and exposure, which places my attention on the subject and not on the screen or gear.

#5 – Sustain Your Inspiration

Get a printed book by a photographer you enjoy. After you read it, create a series of photographs inspired by one main idea in the book that has inspired you.

When I ordered a copy of William Neill: Photographer A Retrospective direct from the photographer himself, Neill’s eloquent writing in a chapter called By Nature’s Design made an impact on me. He wrote:

“My By Nature’s Design photographs invite the viewer to discover and appreciate natural patterns: the sensuous ripples of glistening wet mud in a desert stream; the repeated tracings of veins in fallen leaves; the intricate cracking of tree bark; or the crystalline forms seen in ice. Underlying the many modifications and patterns that occur in nature is a hidden unity.”

I was inspired and motivated by Neill’s photographs and writing on nature’s patterns to complete a longstanding series I’d done on water and its patterns. By observing the work of master photographers, we learn and can take on new energy for our own work. As photographer Robert Adams said:

“Your own photography is never enough. Every photographer who has lasted has depended on other people’s pictures too‒photographs that may be public or private, serious or funny, but that carry with them a reminder of community.”

Bonus Tip: Curate

We work on the media to improve its appearance, sound, or presentation. Curating, we trim down the number of our pictures to express a coherent theme with a limited number of images.

When I curate my work, choosing only the best, I try to select just ten pictures. Then, because printing images is vital to make them into haptic objects I can touch, I print these ten at smaller sizes. I print at 4″ x 6″, or 5″ x 7″ size and hang them on a wall that I pass by daily.

As time passes, half of these pictures drop out because they become less interesting. I add a few more in the gaps in the sequence. Finally, the best ones that I seem to keep looking at seem to resonate.

These, I make into larger prints for projects. In a productive year, if there are 5-10 coherent and well-printed images, I celebrate with a sense of accomplishment.

https://www.apogeephoto.com/five-ideas-from-field-to-final-print/


Better People Pictures for Your Holidays

​​

“Like people, and let them know it,” said Cornell Capa, the Hungarian-born photographer and Magnum photo agency founder, when he was asked for the secret of taking good pictures.

Over the winter holidays, spending time with our loved ones, we make priceless pictures. We take them for fun, for sharing, to put into family albums and because we cherish the memories.

Liking and Lighting

PHOTO 1: When you like the people you photograph, it shows. Then, turn your camera vertically. Finally, warm up the hues of the picture in your editing… read on for more on this in a moment.

So, “liking” is good, and “liking and lighting” our loved ones makes for interesting holiday pictures. Taking a few extra steps to get enough light of the right quality helps to reveal those loving moments we spend with friends and family. Here are five ideas for framing and lighting that I hope will prove useful for your holiday portraits.

1. Portrait Framing

Turn the camera or phone for portrait orientation instead of landscape. A vertical composition works better for pics of the entire person, or when you want to include their clothing. I like to make two shots and try to get both in focus: the first for the entire body including people’s feet, and a second from their waist up, that includes people’s hands and arms.

For many people the iPhone (iPhone XS/iPhone XR/iPhone 8+, iPhone 7+) is a portrait camera. If you have an iPhone but can not make portrait work, go to the iPhone Channel on Youtube for the solution to get that portrait mode working (for iPhone 6s and up).

2. Soften Your Flash

In winter, some cameras compensate for low light and dark days by blasting a harsh, high-contrast auto flash. This direct lighting is the least desirable light intensity and direction for people pictures.

For a solution, place a piece of transparent paper or tissue with light-colored tape over the camera flash. You’ll create a softer, more flattering light for the people you love, and your colors will still look good.

3. Grab a Free App

Snapseed is a free, downloadable photo editing app from NIK, and under its Tune Image menu, I tap the “Tools”+ “Portrait” settings to adjust many holiday portraits.

( TIP: Download Snapseed and try Portrait under the Tools settings, select Tune Image, then swipe your finger to the right to brighten your photo).

I use the apps “Eyes Brightening” setting most often to add a touch of light to them. Snapseed’s 10 Portrait settings include edits for smoothing the skin, brightening the face, or a combination of all these with the Eyes Brightening edit, all together. One caveat is that the Snapseed app must identify a face in the picture, so while “Tools”+ “Portrait” didn’t work with a photo I took of my dog by herself, the app did brighten and smooth my face and eyes in a photo of me and the dog. 

4. The Eyes Have It

PHOTO 3: Toddler with Mom. Getting low, and placing the camera on eye level is vital for photos of younger folks. Here, my camera is a foot off the ground.

Good light in the eyes can make a portrait much more interesting. We want our loved ones to look happy and younger for holiday pictures. Many pictures on social media are taken from below eye level. If you look at work by pro portrait photographers, and you’ll see that most often the camera was at eye level or above. Why?

Pictures that are taken when the camera is below the nose, mouth, chin level or even lower make the subject look older because shadows and wrinkles are more visible. Take extra time to ensure you are on eye level before you press the shutter. Place people in good light, so their eyes have a catchlight, but move them, so they are not looking into bright sunlight or artificial light. In the winter, the sun is lower, and the light tends to be blue in hue. With this in mind, you can have people look into afternoon sunlight, but be sure to warm up the picture with your editor in post-processing.

HOLIDAY DISPLAY WITH FAMILY : For Holiday pictures, try to avoid bright, busy backgrounds. If that is not possible, move closer to your subject and blur the background with a shallow depth of field ( Aperture settings of F/2, F/2.8 or F/4 settings for the lens opening) or, in post-processing, try an App that blurs your background.

5. Plan a Softer, Cleaner Background

Keep your background simple. Avoid bright, busy backgrounds with a lot of light behind your loved ones. There are two ways to soften backgrounds.

For DSLR Owners

If you have a DSLR, use a wide aperture with a smaller setting number like f/2, f/2.8, f/3.5, f/4 or f/5.6 to create a natural fading of focus behind your subject.

PHOTOS 5 AND 6: Soften and blur the background. When taking holiday pictures, it helps to put the focus on the person, not the background. If the background is cluttered, or bright, use an app to apply a slight blur. This helps the person stand out.

After Focus for Smartphones 

For many people, a downloadable app is an effective solution to get softer backgrounds. If you take photos with Android devices or with your iPhone, I recommend After Focus in the Google Play Store. It lets you pull focus to the areas you want to pop out. When you install the App, you can tap with your finger on your device to add focus. The After Focus app lets your depth of field naturally fade, more like a 35 mm digital camera does. There is even a setting to change your aperture blades. This natural approach to fading blur and controlling aperture allows a pro photographic feel to your portraits. While its user interface is a bit more involved, there are loads of user tips, and the results are great. Be mindful that all free apps have advertisements. There is a free version in the Google Play store, or you can pay $0.99 cents on iTunes.

PHOTO 7: The best tip is to like the people who are with you and let them know it.

About the Author: Jim Austin Jimages is a full-time basenji owner, live-aboard sailor, and sometime singer for the Salty Paws band. He practices Slow Photography daily. On Amazon, his book Ruins and Rust: Illuminating the Hidden Bahamas, is a fine art hardcover work.

https://www.apogeephoto.com/better-holiday-pictures/


How to Crop in Photoshop

Picture 1: A photo in need of cropping and straightening. All text and photographs (c) Jim Austin Jimages.

Do you have a photo that needs cropping? Want to straighten a horizon? Open Photoshop and grab your crop tool.

CROP, FRAME & TRIM

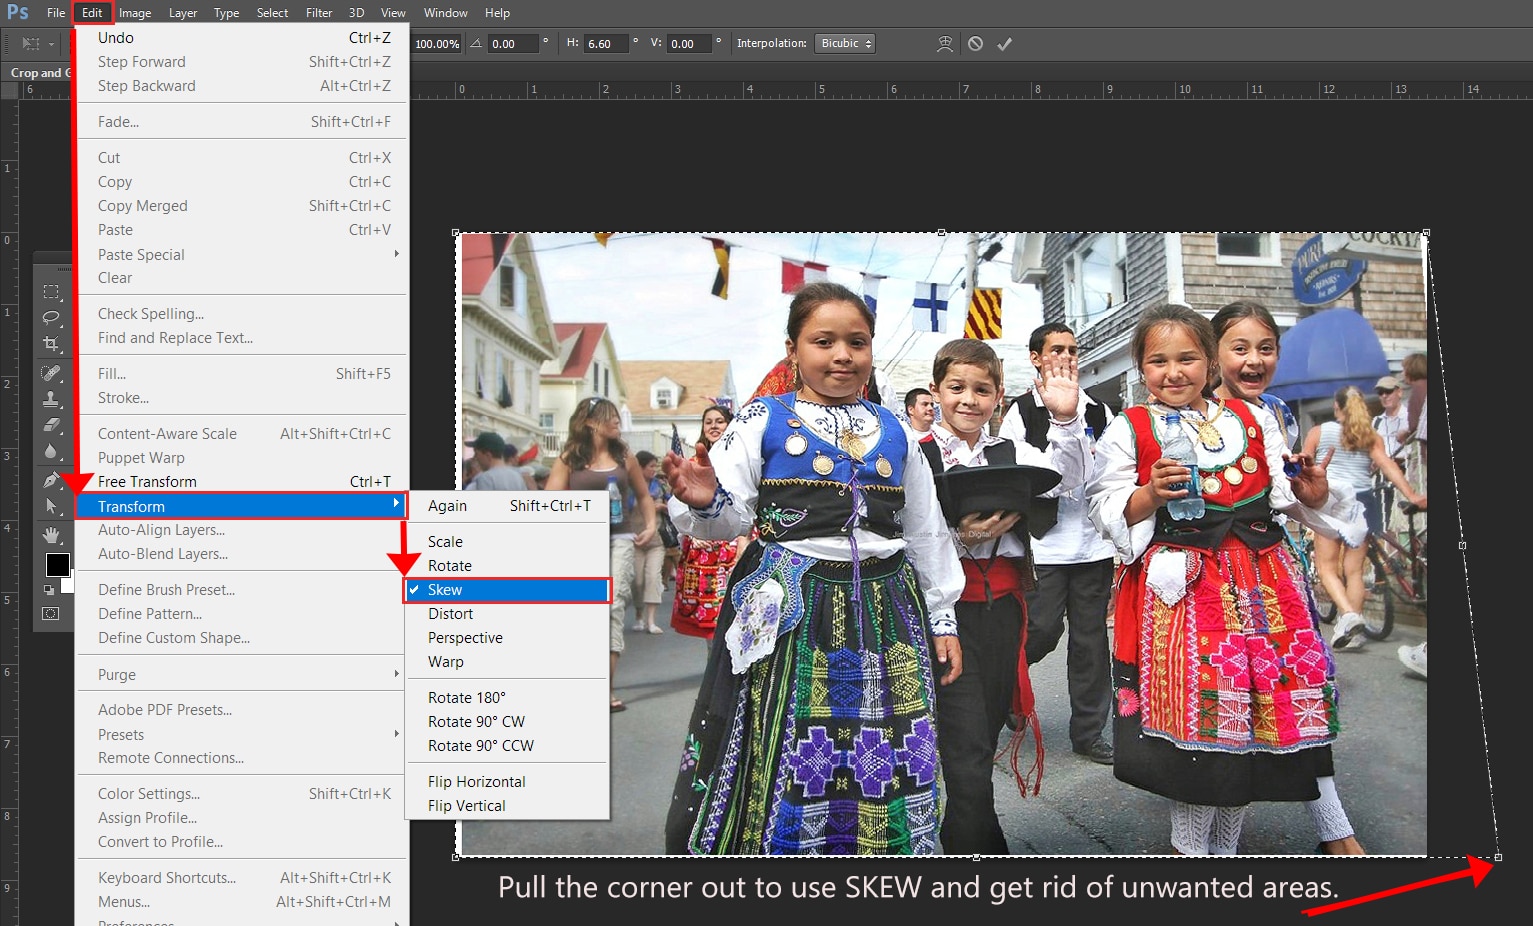
First, we’ll cover a basic “how to” method for cropping. Second, we’ll make a matt border for a photo. Finally, we’ll learn how to trim unwanted stuff from around an image and explore an advanced transform command to complete a photograph.

1. BASIC CROPPING

Time: 3-5 minutes

Level: Easy, beginner.

Picture 2: crop tool location.

Step 1: Open your photograph in Photoshop. Find the Tools Palette (Window > Show Tools) and click the Crop Tool, the third tool down on the left side.

Step 2: Look at the corners of your image, and you’ll see the four symbols at the corners of the crop tool bounding box. Position your cursor (with your mouse or Wacom tablet cursor or touch screen) on one corner box and drag in inward to crop the picture.

Picture 3: Setting a custom color for the area outside the cropped area, which Adobe calls the crop shield.

Step 3: Notice that when you drag inward, the area outside the crop, the crop shield, turns color and becomes shaded. You can change this color just by clicking the Circular Gear (see above Picture 3) and choosing Enable Crop Shield > Custom Color. Then pick your color from the color picker.

[Tip: At any time, if we get stuck, we can type the “esc” key on the keyboard to cancel and exit from a crop. The “enter/return” key on the keyboard applies the crop tool to an image. ]

Step 4: Click the Enter or Return Key to apply your crop.

Success! Great job, you’ve cropped your photograph. Those are the crop tool basics and now, let’s straighten…

2. STRAIGHTEN A PHOTOGRAPH WITH YOUR CROP TOOL

Time: 2 minutes.

Level: Easy, beginner.

Picture 4: This shows the bounding box with its 6 symbols, one in each corner and 2 in the center, that you click on and drag to crop horizontally and vertically. Type “Enter” to apply your crop. All photos and text copyright www.jimages.com

Step 1: Straighten. Open a photograph in Photoshop. Click the Crop Tool. Position your cursor outside the image area. You’ll see a small curved symbol with two arrows at 90 degrees. Put your cursor outside the bounding box, close in to one of the 4 corners and then drag to rotate this symbol clock wise or counterclockwise to straighten your photograph. For example, this is useful to straighten a photograph with a crooked horizon.

Step 2: Click Enter or Return to apply your rotation.

3. MAKE A MATTE BORDER WITH THE CROP TOOL

Here is an easy way to expand the border around your photograph and create a digital matte border with the crop tool to present your image in a more creative way.

Time: 2-5 minutes

Level: Intermediate

Step 1: First, Type “D” on your keyboard letters to reset the foreground and background colors in the tool box to black (foreground) and white (background color square, located at the bottom of the tool box).

Step 2: Click and drag the upper left corner of the bounding box up and to the left.

Step 3: Now, position your cursor over the lower right corner square of the crop tool bounding box. Click on it and drag it down and to the right so it moves the same distance away from the corner as in Step 2.

Step 4: Type the Enter Key. You will see a border appear with the same color as the background color square in your tool box, which in this case is the color white, as we set that color in Step 1. To make the crop tool bounding box disappear, click any other tool in the tool box.

4. GET RID OF IRREGULAR EDGES ON A PHOTOGRAPH

The goal is to use the crop tool, combined with a Photoshop menu command, to get rid of unwanted edges so the image fills the entire picture area.

Time: 5-10 minutes.

Level: Intermediate.

Picture 5: The Edit > Transform command lets you clean up blank areas around a photo, straighten skewed edges, and warp corners to get rid of unwanted image areas.

Step 1: With your photo open in Photoshop, click on the crop tool. You will see the bounding box.

Step 2: To eliminate unwanted areas around the outside of the image, look up to the top left of the Photoshop top menu. Find “Edit” between File and Image. Click Edit. A drop-down menu appears. Look halfway down this menu to find the word transform.

Step 3: Click  Edit > Transform.

Step 4: Choose Edit > Transform > Skew or the menu sequence Edit > Transform > Warp.

Step 5: With your cursor, pull the corners of the bounding box out from the image window. The image will move. By skewing or distorting the image, pulling with the corner symbol, you can fill in unwanted or blank areas within the picture itself. Make your picture fill the image window so no more irregular area can be seen. Sometimes the Edit > Transform > Warp command sequence works better to get rid of thin or irregular areas.

Advanced Tip: With Edit Transform, you can also scale your photo, rotate it 90 degrees or flip it horizontally and vertically.

Jim Austin Jimages new book is Sublight: Seasons in Slow Photography, 2019, at www.jimages.com

https://www.apogeephoto.com/crop-photoshop/


How To Flip an Image in Photoshop

how to flip an image in photoshop
Have you ever wanted to know how to flip a picture in Photoshop?

These are the key steps for flipping your photograph in Adobe Photoshop. This image editor lets you choose between a vertical and a horizontal flip. Since a horizontal flip is a more practical and common edit, let us see how that works. Although the technique’s wording may differ a bit, depending on which version of Adobe Photoshop you have, it takes just three easy steps. Then, if you like, set up a keyboard shortcut to save time and boost your skills.

FLIPPING AN IMAGE IN PHOTOSHOP

Time: 3 minutes.

Level: Beginner, Easy.

Step 1: Open Photoshop. Open a photo into Photoshop. File > Open ( ctrl + O/Command + O).

Step 2: In Photoshop’s top menu, find the word Image, between the word Edit and Layer.Click Image > Image Rotation> Flip Canvas Horizontal.

Step 3: Save your image file (ctrl + S / Command + S). Great, you now have learned an easy technique for flipping your photograph in Photoshop. That’s it !

Advanced Tip: A keyboard shortcut is designed to save you time navigating the menu. To make your own keyboard shortcut for flipping an image, Click Alt + Shift + Ctrl + K to bring up the shortcut dialog. Next, Click Image. Look down the dialog box to click Flip Horizontal and put in a new Keyboard Shortcut ( I used two keyboard keys: “ctrl + , “). Click Accept. Click Save. Try the Shortcut a few times and you’ll see your photograph flip horizontally back and forth.

CLOSING THOUGHTS

Of course, flipping an image horizontally makes a mirror image, and flipping vertically turns your photo  upside down. You can flip a photo in Photoshop Elements, or in the Photoshop Express app.

More from this Author: Magic Light for Nature Lovers. 

https://www.apogeephoto.com/how-to-flip-image-photoshop/


How to Set Business Goals for 2019 and Beyond

As we welcome 2019, business owners look into the future for growth and improvement beyond mere sales figures. Goal setting is a big part of business growth. Those who set specific and measurable goals are much more likely to succeed. If you want your business thriving in 2019 and beyond, write out your goals, and come up with a plan for reaching those goals.

It isn’t easy figuring out which goals to set and how to make them specific to your business. Here are nine precise steps toward setting your new business goals.

1. Collaborate With Your Team

Setting goals works better when company leaders and employees both offer their viewpoints — it becomes clear what’s possible and what isn’t. First, gather information from everyone on your team. Business goals should include the views of every department, from human resources to marketing. Each goal must mesh with the others, so the more input you receive from employees, the better.

The boss can set goals for everyone, but when your employees feel like they’re part of the process, they’ll work harder to help you achieve those goals.

2. Look at Broad Trends

Take the time to study internal analytics and trends in your business. If revenue falls by 50 percent every January, how can you increase income in the first quarter? Study both positive and negative patterns to see what works and what doesn’t.

Set specific goals to overcome the negatives of your business as well as ones that take advantage of what works well. Brainstorm with department heads, and figure out ways to improve even a modest 10 percent each year.

3. Set SMARTA Objectives

Set key goals and objectives that are specific and measurable. SMARTA goals help you set goals and take the steps toward achieving them. SMARTA stands for:

  • Specific: Create specific goals with a narrow focus.
  • Measurable: Decide how you’ll measure success (sales numbers, subscriber growth, etc.).
  • Achievable: Your goals should be possible, or you’ll get discouraged.
  • Relevant: Goals must make sense for the next phase of a business’ growth.
  • Timed: Set deadlines.
  • Agreed: Consult with company leaders and get their input.

Simply setting goals isn’t enough — set them with a purpose and vision.

4. Create an Editorial Calendar

Publishing frequently results in more exposure — businesses that publish at least 16 posts each month get over three times the attention. However, business owners often get distracted by the many other aspects of running a business and forget to schedule new posts. An editorial calendar creates a plan for what to post and when.

5. Hold Daily Meetings

Creating a plan is a nice start, but if you don’t follow through with it, it’s worthless. When you first come up with goals, the excitement drives you toward achieving them. As the year goes on, however, the excitement fades.

Holding daily meetings provides an opportunity to get everyone back on the same page and look at what tasks were completed and what ones need more focus.

6. Break Big Goals Into Smaller Ones

In one study on New Year’s resolutions, researchers found that only eight percent of people achieve their goals. One reason for abandoning goals is that large ones seem overwhelming.

One solution is to break big goals into smaller goals, which are more achievable. Look at your broad goals and divide them into smaller tasks that you can check off as you complete them.

7. Make the Goals Visible

One way to keep your eyes on the prize throughout the year is to write out your goals where everyone can see them and make them as visible as possible. Create large wall hangings and send out team email reminders about smaller goals.

Once you achieve a goal, either add a sizeable green checkmark over it or replace it with a new one. Seeing goals in black and white prioritizes the most critical ones over less important tasks.

8. Find an Accountability Partner

Saying you’ll do X, Y and Z is easy, but following through is more laborious. Keep your eye on the prize by finding a mentor or someone to whom you’re accountable. Set up specific deadlines for check-ins to see where you’re at with your goals.

A good accountability partner understands your business and cares about your success. For example, another executive in a different department has a stake in your success because it impacts the company as a whole. For small businesses, seeking out another business owner who is not your competition but is in a similar industry would be a great option.

9. Reward Small Successes

Make progress toward your end goal by rewarding the small successes along the way. If your big goal is to double sales in 2019 and you add 25 percent new revenue in the first quarter, you’re a quarter of the way there. Go ahead and reward employees with a pizza party at lunch or a cake in the breakroom. Take a day off for team building or some other fun activity. When employees know they have something positive to look forward to along the way, they’re more likely to keep plugging ahead.

Create Multi-Year Plans

Goals should go far beyond the next few months or year and on into five years, 10 years and even 15 years in the future. Sure, the ones so far in advance change and morph, but having them maintains focus. Write your business goals out and break them down into smaller tasks until your dreams become a reality.

How to Set Business Goals for 2019 and Beyond